> ## Documentation Index
> Fetch the complete documentation index at: https://dripart-chore-sync-comfy-api-v2-spec-462120c.mintlify.site/llms.txt
> Use this file to discover all available pages before exploring further.
# Qwen-Image ComfyUI 네이티브 워크플로우 예시
> Qwen-Image는 Apache 2.0 라이선스로 오픈소스화된 20B 파라미터 MMDiT(멀티모달 디퓨전 트랜스포머) 모델입니다.
**Qwen-Image**는 알리바바의 Qwen 팀이 발표한 최초의 이미지 생성 기반 모델입니다. 이 모델은 Apache 2.0 라이선스로 오픈소스화된 20B 파라미터 MMDiT(멀티모달 디퓨전 트랜스포머) 모델입니다. 이 모델은 **복잡한 텍스트 렌더링**과 **정밀한 이미지 편집**에서 큰 진전을 이루었으며, 영어와 중국어를 포함한 여러 언어에 대해 고화질 출력을 달성했습니다.
**모델 주요 특징**:
* **우수한 다국어 텍스트 렌더링**: 영어, 중국어, 한국어, 일본어 등 다양한 언어에서 고정밀 텍스트 생성을 지원하며, 글꼴 세부 정보와 레이아웃 일관성을 유지합니다.
* **다양한 예술적 스타일**: 포토리얼리즘 장면부터 인상파 그림, 애니메이션 스타일부터 미니멀리즘 디자인까지 다양한 창작 프롬프트에 유연하게 적응합니다.
**관련 링크**:
* [GitHub](https://github.com/QwenLM/Qwen-Image)
* [Hugging Face](https://huggingface.co/Qwen/Qwen-Image)
* [ModelScope](https://modelscope.cn/models/qwen/Qwen-Image)
현재 Qwen-Image는 여러 ControlNet 지원 옵션을 제공합니다:
* [Qwen-Image-DiffSynth-ControlNets/model\_patches](https://huggingface.co/Comfy-Org/Qwen-Image-DiffSynth-ControlNets/tree/main/split_files/model_patches): 캐니, 딥스, 인페인트 모델 포함
* [qwen\_image\_union\_diffsynth\_lora.safetensors](https://huggingface.co/Comfy-Org/Qwen-Image-DiffSynth-ControlNets/blob/main/split_files/loras/qwen_image_union_diffsynth_lora.safetensors): 이미지 구조 제어 LoRA, 캐니, 딥스, 포즈, 라인아트, 소프트엣지, 노말, 오픈포즈 지원
* InstantX ControlNet: 추후 업데이트 예정
## ComfyOrg Qwen-Image 라이브 스트림
**Qwen-Image in ComfyUI - Lightning & LoRAs**
**Qwen-Image ControlNet in ComfyUI - DiffSynth**
## Qwen-Image 네이티브 워크플로우 예시
ComfyUI가 최신 버전으로 업데이트되었는지 확인하세요.
* [ComfyUI 다운로드](https://www.comfy.org/download)
* [업데이트 가이드](/ko/installation/update_comfyui)
이 가이드의 워크플로는 [워크플로 템플릿](/ko/interface/features/template)에서 확인할 수 있습니다.
템플릿에서 찾을 수 없다면, 귀하의 ComfyUI가 오래된 버전일 수 있습니다.
워크플로를 로드할 때 노드가 누락되는 경우, 가능한 원인:
1. 최신 ComfyUI 버전(최신 테스트 버전(nightly))을 사용하고 있지 않음
2. 일부 노드가 시작 시 가져오기에 실패함
* [클라우드](https://cloud.comfy.org)는 ComfyUI 안정판 출시 후 업데이트됩니다.
따라서 이 문서에서 핵심 노드가 누락된 것을 발견했다면, 그 이유는 새로운 핵심 노드가 아직 최신 안정판에 공개되지 않았기 때문일 수 있습니다. 다음 안정판 출시를 기다려 주세요.
Qwen-Image: 텍스트 기반 이미지 생성
Qwen-Image의 20B MMDiT 모델을 사용하여 탁월한 다국어 텍스트 렌더링 및 편집 기능으로 이미지를 생성하세요.
Comfy Cloud에서 열기
JSON 다운로드 또는 템플릿 라이브러리에서 "Qwen-Image" 검색
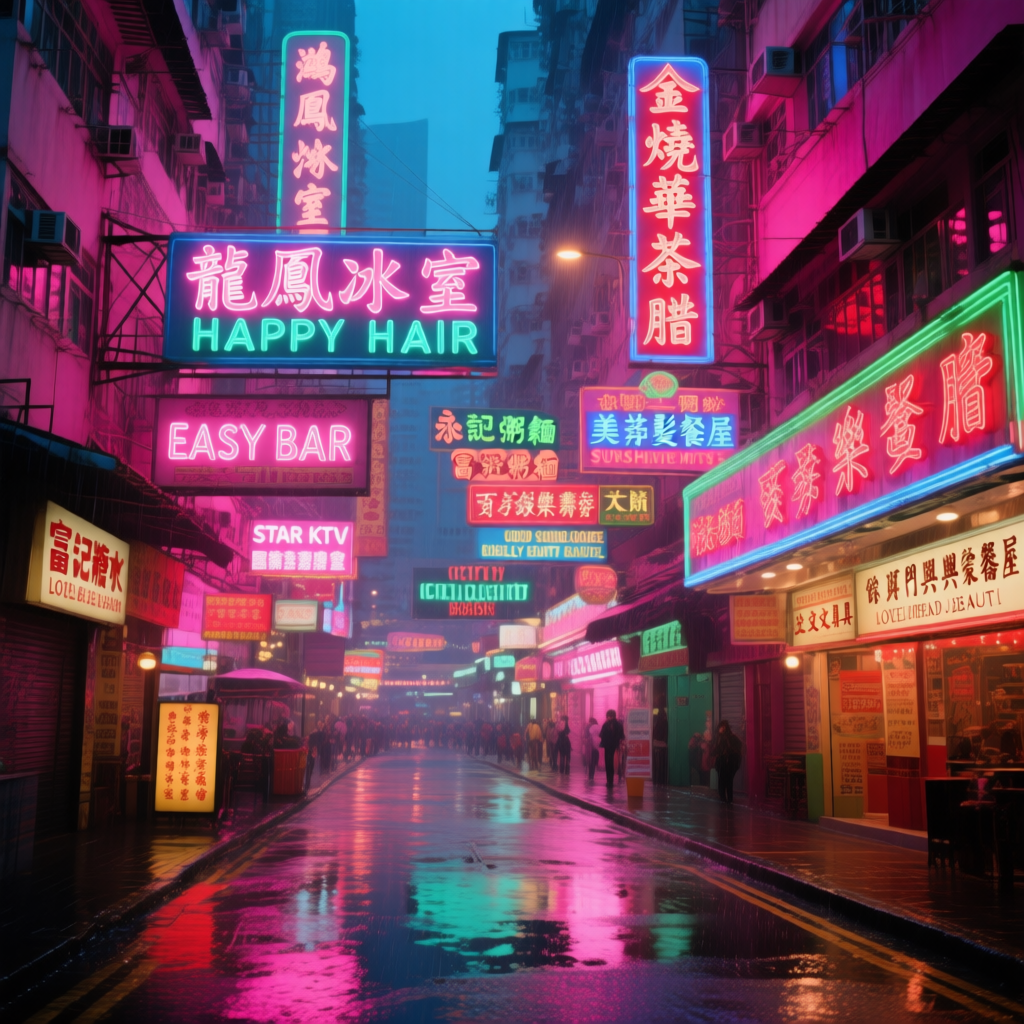
**출력 예시**
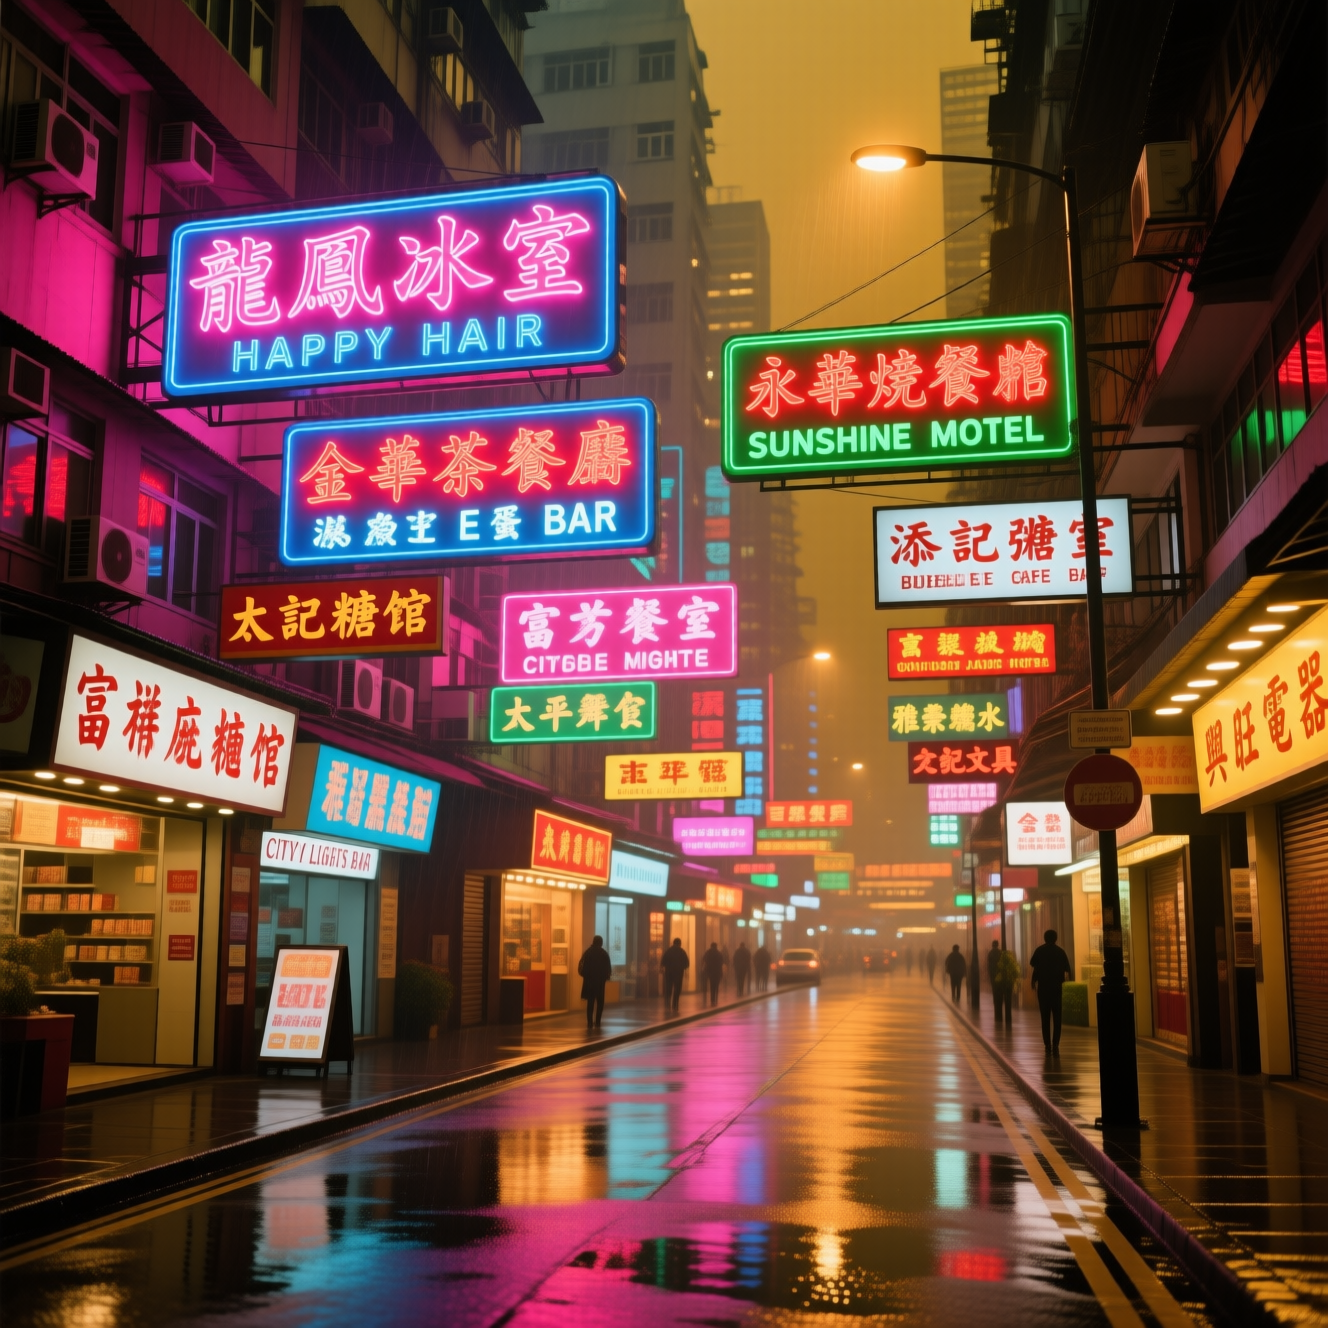
이 문서에 첨부된 워크플로우에는 세 가지 다른 모델이 사용됩니다:
1. Qwen-Image 원본 모델 fp8\_e4m3fn
2. 8단계 가속 버전: Qwen-Image 원본 모델 fp8\_e4m3fn에 lightx2v 8단계 LoRA 적용
3. 증류 버전: Qwen-Image 증류 모델 fp8\_e4m3fn
**VRAM 사용량 참고**
GPU: RTX4090D 24GB
| 사용된 모델 | VRAM 사용량 | 첫 번째 생성 | 두 번째 생성 |
| --------------------------------- | -------- | ------- | ------- |
| fp8\_e4m3fn | 86% | ≈ 94s | ≈ 71s |
| fp8\_e4m3fn에 lightx2v 8단계 LoRA 적용 | 86% | ≈ 55s | ≈ 34s |
| 증류된 fp8\_e4m3fn | 86% | ≈ 69s | ≈ 36s |
### 1. 워크플로우 파일
ComfyUI를 업데이트한 후, 템플릿에서 워크플로우 파일을 찾거나 아래 워크플로우를 ComfyUI로 드래그해 불러올 수 있습니다.
증류 버전
JSON 워크플로우 다운로드
### 2. 모델 다운로드
**ComfyUI에서 사용 가능한 모델**
* Qwen-Image\_bf16 (40.9 GB)
* Qwen-Image\_fp8 (20.4 GB)
* 증류 버전 (비공식, 15단계만 필요)
모든 모델은 [Huggingface](https://huggingface.co/Comfy-Org/Qwen-Image_ComfyUI/tree/main) 및 [Modelscope](https://modelscope.cn/models/Comfy-Org/Qwen-Image_ComfyUI/files)에서 확인 가능합니다.
**Diffusion 모델**
* [qwen\_image\_fp8\_e4m3fn.safetensors](https://huggingface.co/Comfy-Org/Qwen-Image_ComfyUI/blob/main/split_files/diffusion_models/qwen_image_fp8_e4m3fn.safetensors)
Qwen\_image\_distill
* [qwen\_image\_distill\_full\_fp8\_e4m3fn.safetensors](https://huggingface.co/Comfy-Org/Qwen-Image_ComfyUI/blob/main/non_official/diffusion_models/qwen_image_distill_full_fp8_e4m3fn.safetensors)
* [qwen\_image\_distill\_full\_bf16.safetensors](https://huggingface.co/Comfy-Org/Qwen-Image_ComfyUI/blob/main/non_official/diffusion_models/qwen_image_distill_full_bf16.safetensors)
- 증류 버전의 원저자는 cfg 1.0에서 15단계 사용을 권장합니다.
- 테스트 결과, 이 증류 버전은 cfg 1.0에서 10단계에서도 우수한 성능을 보입니다. 원하는 이미지 유형에 따라 euler 또는 res\_multistep 중 선택할 수 있습니다.
**LoRA**
* [Qwen-Image-Lightning-8steps-V1.0.safetensors](https://huggingface.co/lightx2v/Qwen-Image-Lightning/blob/main/Qwen-Image-Lightning-8steps-V1.0.safetensors)
**텍스트 인코더**
* [qwen\_2.5\_vl\_7b\_fp8\_scaled.safetensors](https://huggingface.co/Comfy-Org/Qwen-Image_ComfyUI/blob/main/split_files/text_encoders/qwen_2.5_vl_7b_fp8_scaled.safetensors)
**VAE**
[qwen\_image\_vae.safetensors](https://huggingface.co/Comfy-Org/Qwen-Image_ComfyUI/blob/main/split_files/vae/qwen_image_vae.safetensors)
**모델 저장 위치**
```
📂 ComfyUI/
├── 📂 models/
│ ├── 📂 diffusion_models/
│ │ ├── qwen_image_fp8_e4m3fn.safetensors
│ │ └── qwen_image_distill_full_fp8_e4m3fn.safetensors ## 蒸馏版
│ ├── 📂 loras/
│ │ └── Qwen-Image-Lightning-8steps-V1.0.safetensors ## 8步加速 LoRA 模型
│ ├── 📂 vae/
│ │ └── qwen_image_vae.safetensors
│ └── 📂 text_encoders/
│ └── qwen_2.5_vl_7b_fp8_scaled.safetensors
```
### 3. 워크플로우 지침
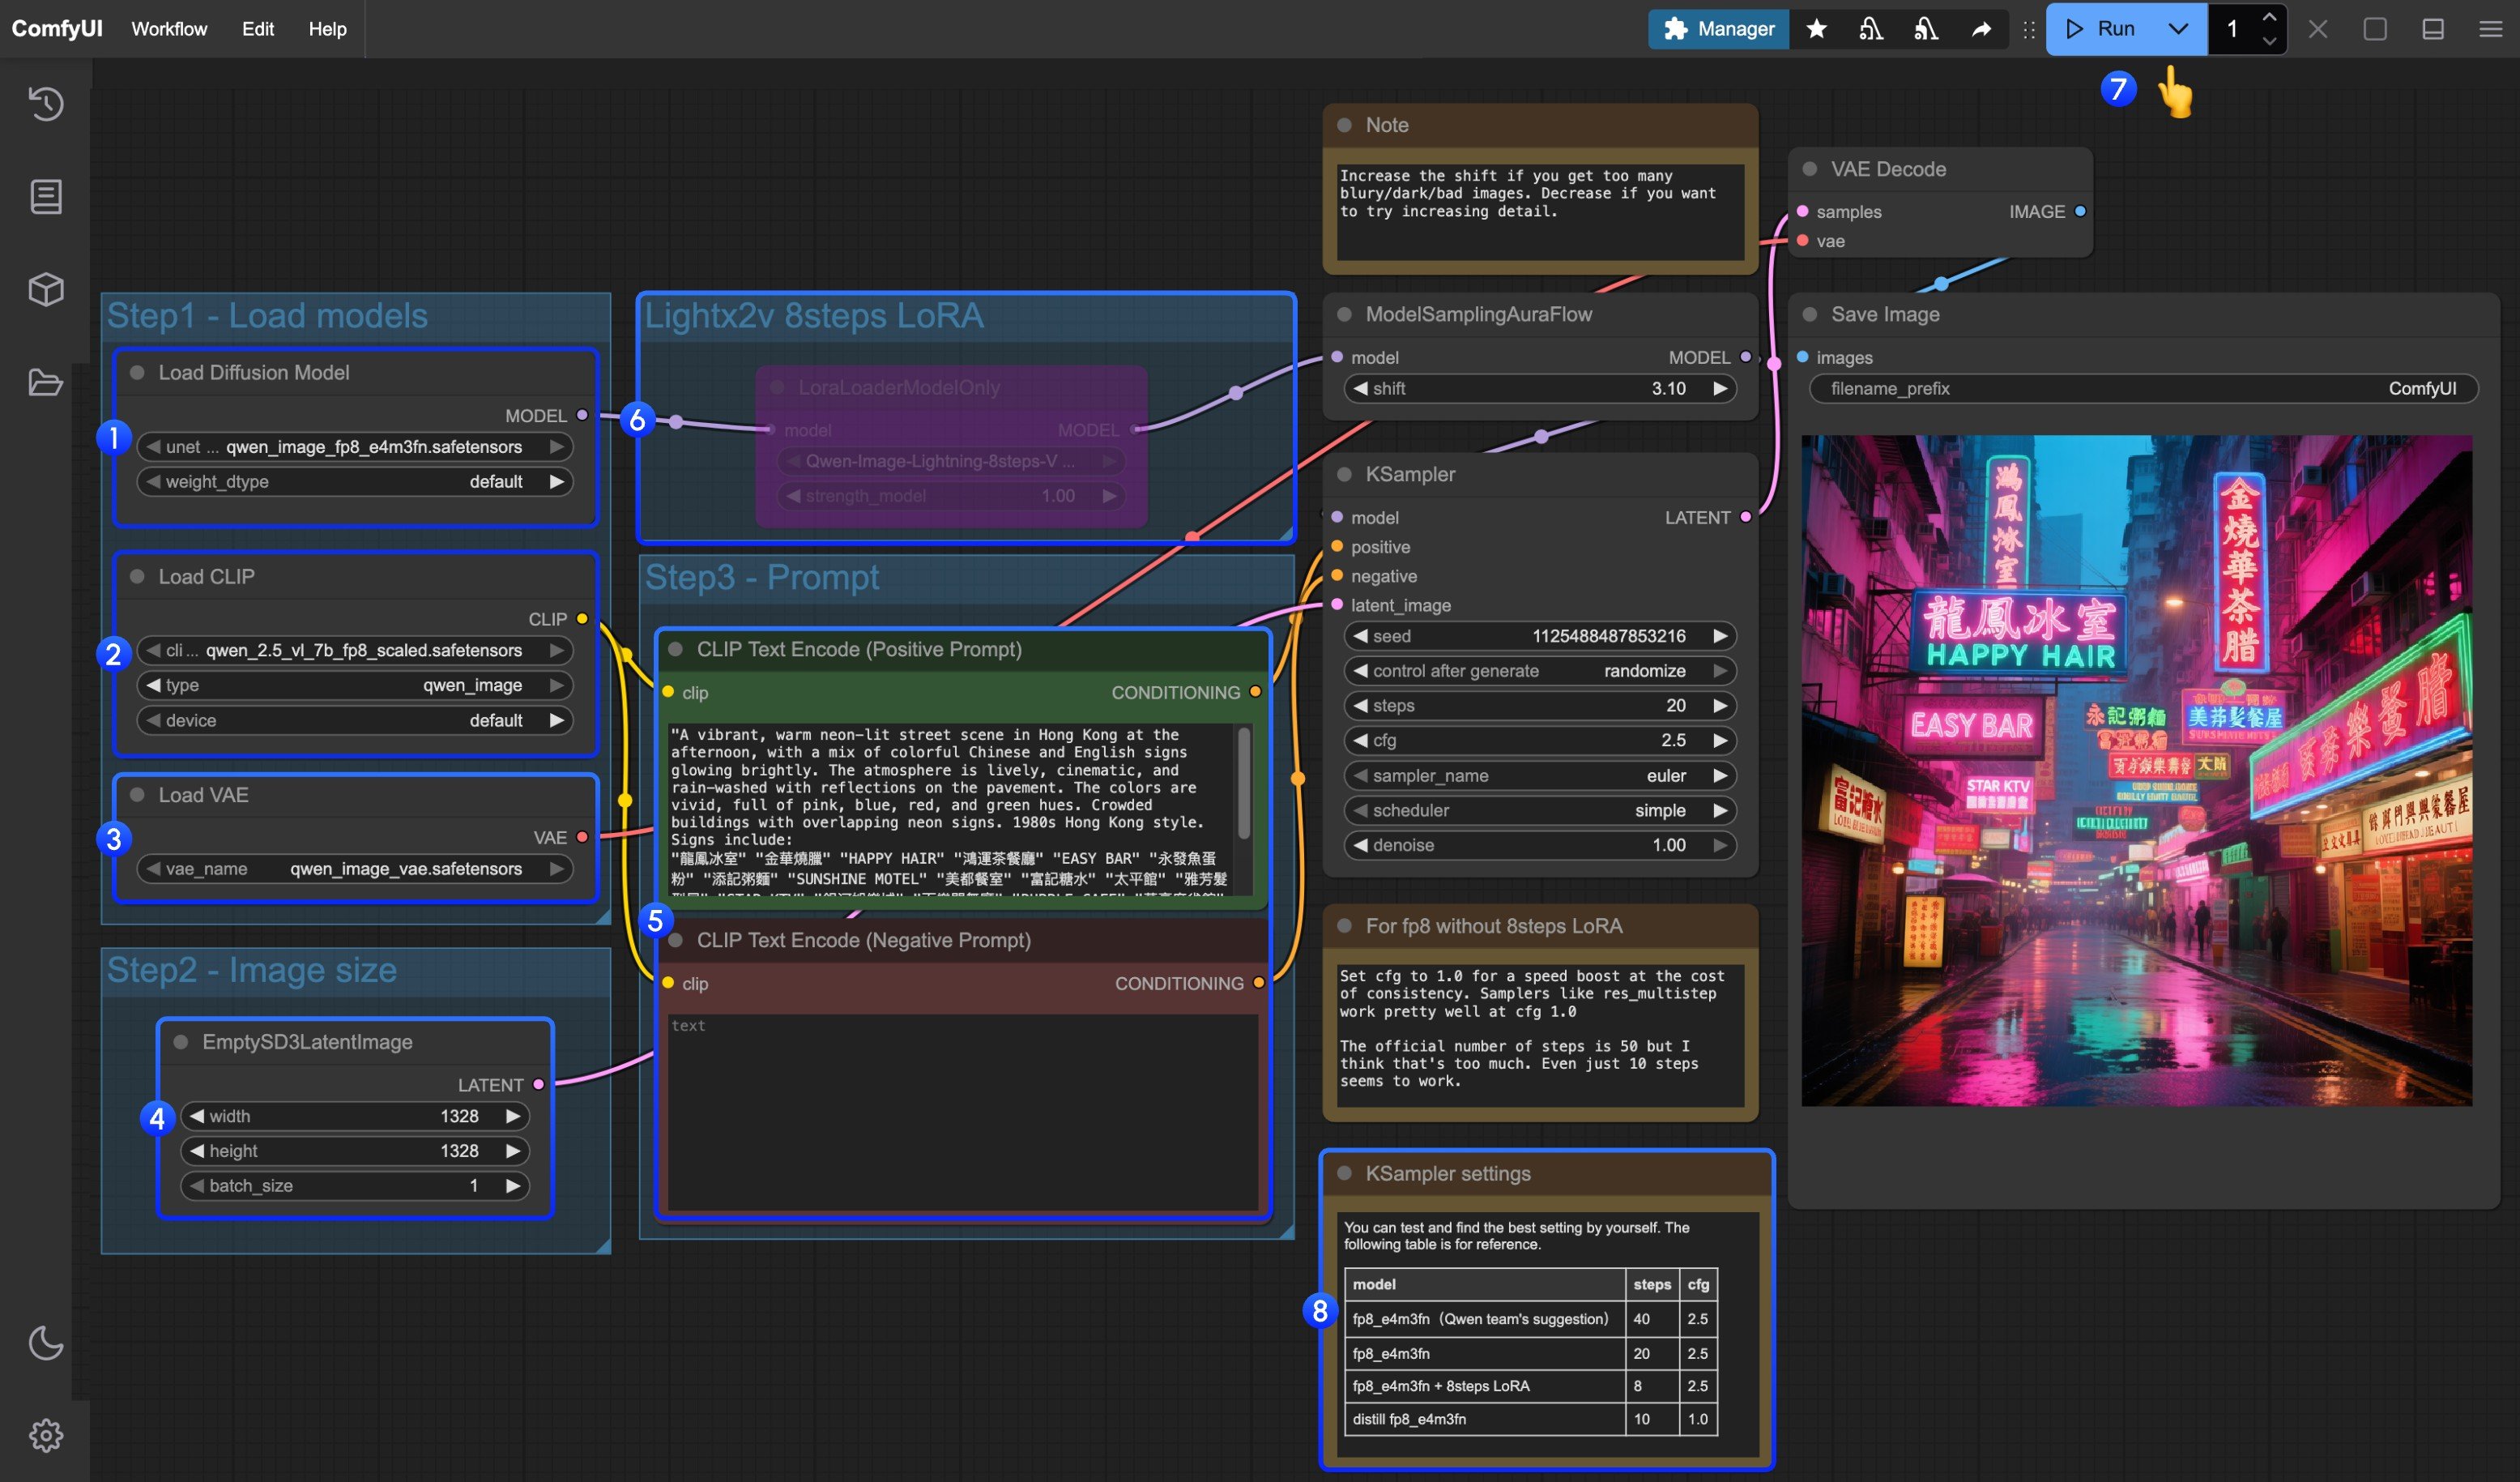
1. `Load Diffusion Model` 노드가 `qwen_image_fp8_e4m3fn.safetensors`를 로드했는지 확인하세요.
2. `Load CLIP` 노드가 `qwen_2.5_vl_7b_fp8_scaled.safetensors`를 로드했는지 확인하세요.
3. `Load VAE` 노드가 `qwen_image_vae.safetensors`를 로드했는지 확인하세요.
4. `EmptySD3LatentImage` 노드가 정확한 이미지 크기로 설정되었는지 확인하세요.
5. `CLIP Text Encoder` 노드에 프롬프트를 설정하세요. 현재 영어, 중국어, 한국어, 일본어, 이탈리아어 등을 지원합니다.
6. 8단계 가속 LoRA를 lightx2v로 활성화하려면 해당 노드를 선택하고 `Ctrl + B`를 눌러 활성화하고, 8번 단계에서 설명한 대로 Ksampler 설정을 수정하세요.
7. `Queue` 버튼을 클릭하거나, 단축키 `Ctrl(cmd) + Enter`를 사용해 워크플로우를 실행하세요.
8. 모델 버전과 워크플로우에 따라 KSampler 파라미터를 적절히 조정하세요.
증류 모델과 lightx2v의 8단계 가속 LoRA는 동시에 사용하기에는 호환되지 않는 것으로 보입니다. 함께 사용할 수 있는지 다양한 조합으로 실험해 보세요.
## Qwen Image InstantX ControlNet 워크플로
이것은 ControlNet 모델이므로 일반 ControlNet처럼 사용할 수 있습니다.
Qwen-Image InstantX Union ControlNet
Qwen-Image InstantX ControlNet으로 이미지를 생성할 수 있으며, canny, soft edge, depth, pose를 지원합니다.
Comfy Cloud에서 열기
JSON을 다운로드하거나 템플릿 라이브러리에서 "Qwen-Image InstantX ControlNet"을(를) 검색하세요.
**입력 자료**
이 파일을 해당 `LoadImage` 노드에 업로드하세요:
`LoadImage` 노드 71 · `image_qwen_image_instantx_controlnet_input_image.jpg`
## 1. Workflow and Input Images
### 2. Model Links
1. InstantX Controlnet
Download [Qwen-Image-InstantX-ControlNet-Union.safetensors](https://huggingface.co/Comfy-Org/Qwen-Image-InstantX-ControlNets/blob/main/split_files/controlnet/Qwen-Image-InstantX-ControlNet-Union.safetensors) and save it to the `ComfyUI/models/controlnet/` folder
2. **Lotus Depth model**
We will use this model to generate the depth map of the image. The following two models need to be downloaded:
**Diffusion Model**
* [lotus-depth-d-v1-1.safetensors](https://huggingface.co/Comfy-Org/lotus/blob/main/lotus-depth-d-v1-1.safetensors)
**VAE Model**
* [vae-ft-mse-840000-ema-pruned.safetensors](https://huggingface.co/stabilityai/sd-vae-ft-mse-original/blob/main/vae-ft-mse-840000-ema-pruned.safetensors) or any SD1.5 VAE
```
ComfyUI/
├── models/
│ ├── diffusion_models/
│ │ └─── lotus-depth-d-v1-1.safetensors
│ └── vae/
│ └── lvae-ft-mse-840000-ema-pruned.safetensors
```
> You can also use custom nodes like [comfyui\_controlnet\_aux](https://github.com/Fannovel16/comfyui_controlnet_aux) to generate depth map.
### 3. Workflow Instructions
1. Ensure that the `Load ControlNet Model` node correctly loads the `Qwen-Image-InstantX-ControlNet-Union.safetensors` model
2. Upload input image
3. This subgraph uses the Lotus Depth model. You can find it in the templates or edit the subgraph to learn more, make sure all the models are loaded correctly
4. Click the `Run` button, or use the shortcut `Ctrl(cmd) + Enter` to run the workflow
## Qwen Image ControlNet DiffSynth-ControlNets 모델 패치 워크플로우
Comfy Cloud에서 실행하기
이 모델은 실제로 ControlNet이 아니라, 캐니, 딥스, 인페인트 등 세 가지 다른 제어 모드를 지원하는 모델 패치입니다.
원본 모델 주소: [DiffSynth-Studio/Qwen-Image ControlNet](https://www.modelscope.cn/collections/Qwen-Image-ControlNet-6157b44e89d444)\
Comfy Org 재호스팅 주소: [Qwen-Image-DiffSynth-ControlNets/model\_patches](https://huggingface.co/Comfy-Org/Qwen-Image-DiffSynth-ControlNets/tree/main/split_files/model_patches)
### 1. 워크플로우 및 입력 이미지
아래 이미지를 다운로드해 ComfyUI로 드래그해 해당 워크플로우를 불러오세요.

아래 이미지를 입력으로 다운로드하세요:

### 2. 모델 링크
다른 모델은 Qwen-Image 기본 워크플로우와 동일합니다. 아래 모델만 다운로드해 `ComfyUI/models/model_patches` 폴더에 저장하면 됩니다.
* [qwen\_image\_canny\_diffsynth\_controlnet.safetensors](https://huggingface.co/Comfy-Org/Qwen-Image-DiffSynth-ControlNets/resolve/main/split_files/model_patches/qwen_image_canny_diffsynth_controlnet.safetensors)
* [qwen\_image\_depth\_diffsynth\_controlnet.safetensors](https://huggingface.co/Comfy-Org/Qwen-Image-DiffSynth-ControlNets/resolve/main/split_files/model_patches/qwen_image_depth_diffsynth_controlnet.safetensors)
* [qwen\_image\_inpaint\_diffsynth\_controlnet.safetensors](https://huggingface.co/Comfy-Org/Qwen-Image-DiffSynth-ControlNets/resolve/main/split_files/model_patches/qwen_image_inpaint_diffsynth_controlnet.safetensors)
### 3. 워크플로우 사용 지침
현재 diffsynth는 캐니, 딥스, 인페인트 세 가지 패치 모델을 제공합니다.
ControlNet 관련 워크플로우를 처음 사용한다면, 제어 이미지는 모델이 인식하고 사용하기 전에 지원되는 이미지 형식으로 사전 처리되어야 한다는 점을 이해해야 합니다.
* 캐니: 처리된 캐니 에지, 라인아트 윤곽선
* 딥스: 공간 관계를 나타내는 사전 처리된 깊이맵
* 인페인트: 마스크를 사용해 다시 그려야 할 영역을 표시해야 합니다.
이 패치 모델은 세 가지 다른 모델로 나뉘므로, 입력 시 정확한 사전 처리 유형을 선택해 이미지가 제대로 처리되도록 해야 합니다.
**캐니 모델 ControlNet 사용 지침**
1. `qwen_image_canny_diffsynth_controlnet.safetensors`가 로드되었는지 확인하세요.
2. 이후 처리를 위해 입력 이미지를 업로드하세요.
3. 캐니 노드는 원본 사전 처리 노드로, 설정한 매개변수에 따라 입력 이미지를 처리해 생성을 제어합니다.
4. 필요하다면 `QwenImageDiffsynthControlnet` 노드의 `strength`를 수정해 라인아트 제어 강도를 조정할 수 있습니다.
5. `Run` 버튼을 클릭하거나, 단축키 `Ctrl(cmd) + Enter`를 사용해 워크플로우를 실행하세요.
> qwen\_image\_depth\_diffsynth\_controlnet.safetensors를 사용하려면 이미지를 깊이맵으로 사전 처리하고 `image processing` 부분을 교체해야 합니다. 이 사용법은 이 문서의 InstantX 처리 방법을 참고하세요. 다른 부분은 캐니 모델 사용법과 비슷합니다.
**인페인트 모델 ControlNet 사용 지침**
인페인트 모델의 경우, [Mask Editor](/ko/interface/maskeditor)를 사용해 마스크를 그린 후 이를 입력 제어 조건으로 사용해야 합니다.
1. `ModelPatchLoader`가 `qwen_image_inpaint_diffsynth_controlnet.safetensors` 모델을 로드했는지 확인하세요.
2. 이미지를 업로드하고 [Mask Editor](/ko/interface/maskeditor)를 사용해 마스크를 그립니다. 해당 `Load Image` 노드의 `mask` 출력을 `QwenImageDiffsynthControlnet`의 `mask` 입력에 연결해 정확한 마스크가 로드되도록 해야 합니다.
3. `Ctrl-B` 단축키를 사용해 워크플로우의 원래 캐니를 바이패스 모드로 설정해 해당 캐니 노드의 처리를 무효화하세요.
4. `CLIP Text Encoder`에서 마스크로 변경하고 싶은 내용을 입력하세요.
5. 필요하다면 `QwenImageDiffsynthControlnet` 노드의 `strength`를 수정해 해당 제어 강도를 조정할 수 있습니다.
6. `Run` 버튼을 클릭하거나, 단축키 `Ctrl(cmd) + Enter`를 사용해 워크플로우를 실행하세요.
## Qwen Image Union ControlNet LoRA 워크플로
Qwen-Image Union Control
Qwen-Image의 통합 ControlNet LoRA를 사용하여 정밀한 구조 제어로 이미지를 생성합니다. 캐니(canny), 뎁스(depth), 라인아트(lineart), 소프트엣지(softedge), 노멀(normal), 오픈포즈(openpose) 등 여러 제어 유형을 지원합니다.
Comfy Cloud에서 열기
JSON 다운로드 또는 템플릿 라이브러리에서 "Qwen-Image Union Control" 검색
**입력 자료**
이 파일을 해당 `LoadImage` 노드에 업로드하세요:
`LoadImage` 노드 73 · `image_qwen_image_union_control_lora_input_image.png`
**출력 예시**
원본 모델 주소: [DiffSynth-Studio/Qwen-Image-In-Context-Control-Union](https://www.modelscope.cn/models/DiffSynth-Studio/Qwen-Image-In-Context-Control-Union/)
Comfy Org 재호스팅 주소: [qwen\_image\_union\_diffsynth\_lora.safetensors](https://huggingface.co/Comfy-Org/Qwen-Image-DiffSynth-ControlNets/blob/main/split_files/loras/qwen_image_union_diffsynth_lora.safetensors): 캐니, 뎁스, 포즈, 라인아트, 소프트엣지, 노멀, 오픈포즈를 지원하는 이미지 구조 제어 LoRA
### 1. 워크플로 및 입력 이미지
ComfyUI를 업데이트한 이후 템플릿에서 워크플로 파일을 찾거나, 위의 워크플로 미리보기를 ComfyUI로 드래그하여 불러올 수 있습니다.
### 2. 모델 링크
아래 모델을 다운로드하세요. 이 모델은 LoRA 모델이므로 `ComfyUI/models/loras/` 폴더에 저장해야 합니다.
* [qwen\_image\_union\_diffsynth\_lora.safetensors](https://huggingface.co/Comfy-Org/Qwen-Image-DiffSynth-ControlNets/blob/main/split_files/loras/qwen_image_union_diffsynth_lora.safetensors): 캐니, 뎁스, 포즈, 라인아트, 소프트엣지, 노멀, 오픈포즈를 지원하는 이미지 구조 제어 LoRA
### 3. 워크플로 지침
이 모델은 캐니, 뎁스, 포즈, 라인아트, 소프트엣지, 노멀, 오픈포즈 제어를 지원하는 통합 제어 LoRA입니다. 많은 이미지 전처리 기본 노드가 완전히 지원되지 않으므로, 다른 이미지 전처리를 완료하려면 [comfyui\_controlnet\_aux](https://github.com/Fannovel16/comfyui_controlnet_aux) 같은 도구를 사용해야 합니다.
1. `LoraLoaderModelOnly`가 `qwen_image_union_diffsynth_lora.safetensors` 모델을 올바르게 로드하는지 확인하세요.
2. 입력 이미지를 업로드하세요.
3. 필요하다면 `Canny` 노드 파라미터를 조정할 수 있습니다. 입력 이미지마다 더 나은 이미지 전처리 결과를 얻기 위해 서로 다른 파라미터 설정이 필요하므로, 해당 파라미터 값을 조정하여 더 많거나 적은 세부 정보를 얻을 수 있습니다.
4. `Run` 버튼을 클릭하거나, 단축키 `Ctrl(cmd) + Enter`를 사용하여 워크플로를 실행하세요.
> 다른 유형의 제어를 사용하려면 이미지 처리 부분도 교체해야 합니다.

 1. `Load Diffusion Model` 노드가 `qwen_image_fp8_e4m3fn.safetensors`를 로드했는지 확인하세요.
2. `Load CLIP` 노드가 `qwen_2.5_vl_7b_fp8_scaled.safetensors`를 로드했는지 확인하세요.
3. `Load VAE` 노드가 `qwen_image_vae.safetensors`를 로드했는지 확인하세요.
4. `EmptySD3LatentImage` 노드가 정확한 이미지 크기로 설정되었는지 확인하세요.
5. `CLIP Text Encoder` 노드에 프롬프트를 설정하세요. 현재 영어, 중국어, 한국어, 일본어, 이탈리아어 등을 지원합니다.
6. 8단계 가속 LoRA를 lightx2v로 활성화하려면 해당 노드를 선택하고 `Ctrl + B`를 눌러 활성화하고, 8번 단계에서 설명한 대로 Ksampler 설정을 수정하세요.
7. `Queue` 버튼을 클릭하거나, 단축키 `Ctrl(cmd) + Enter`를 사용해 워크플로우를 실행하세요.
8. 모델 버전과 워크플로우에 따라 KSampler 파라미터를 적절히 조정하세요.
1. `Load Diffusion Model` 노드가 `qwen_image_fp8_e4m3fn.safetensors`를 로드했는지 확인하세요.
2. `Load CLIP` 노드가 `qwen_2.5_vl_7b_fp8_scaled.safetensors`를 로드했는지 확인하세요.
3. `Load VAE` 노드가 `qwen_image_vae.safetensors`를 로드했는지 확인하세요.
4. `EmptySD3LatentImage` 노드가 정확한 이미지 크기로 설정되었는지 확인하세요.
5. `CLIP Text Encoder` 노드에 프롬프트를 설정하세요. 현재 영어, 중국어, 한국어, 일본어, 이탈리아어 등을 지원합니다.
6. 8단계 가속 LoRA를 lightx2v로 활성화하려면 해당 노드를 선택하고 `Ctrl + B`를 눌러 활성화하고, 8번 단계에서 설명한 대로 Ksampler 설정을 수정하세요.
7. `Queue` 버튼을 클릭하거나, 단축키 `Ctrl(cmd) + Enter`를 사용해 워크플로우를 실행하세요.
8. 모델 버전과 워크플로우에 따라 KSampler 파라미터를 적절히 조정하세요.

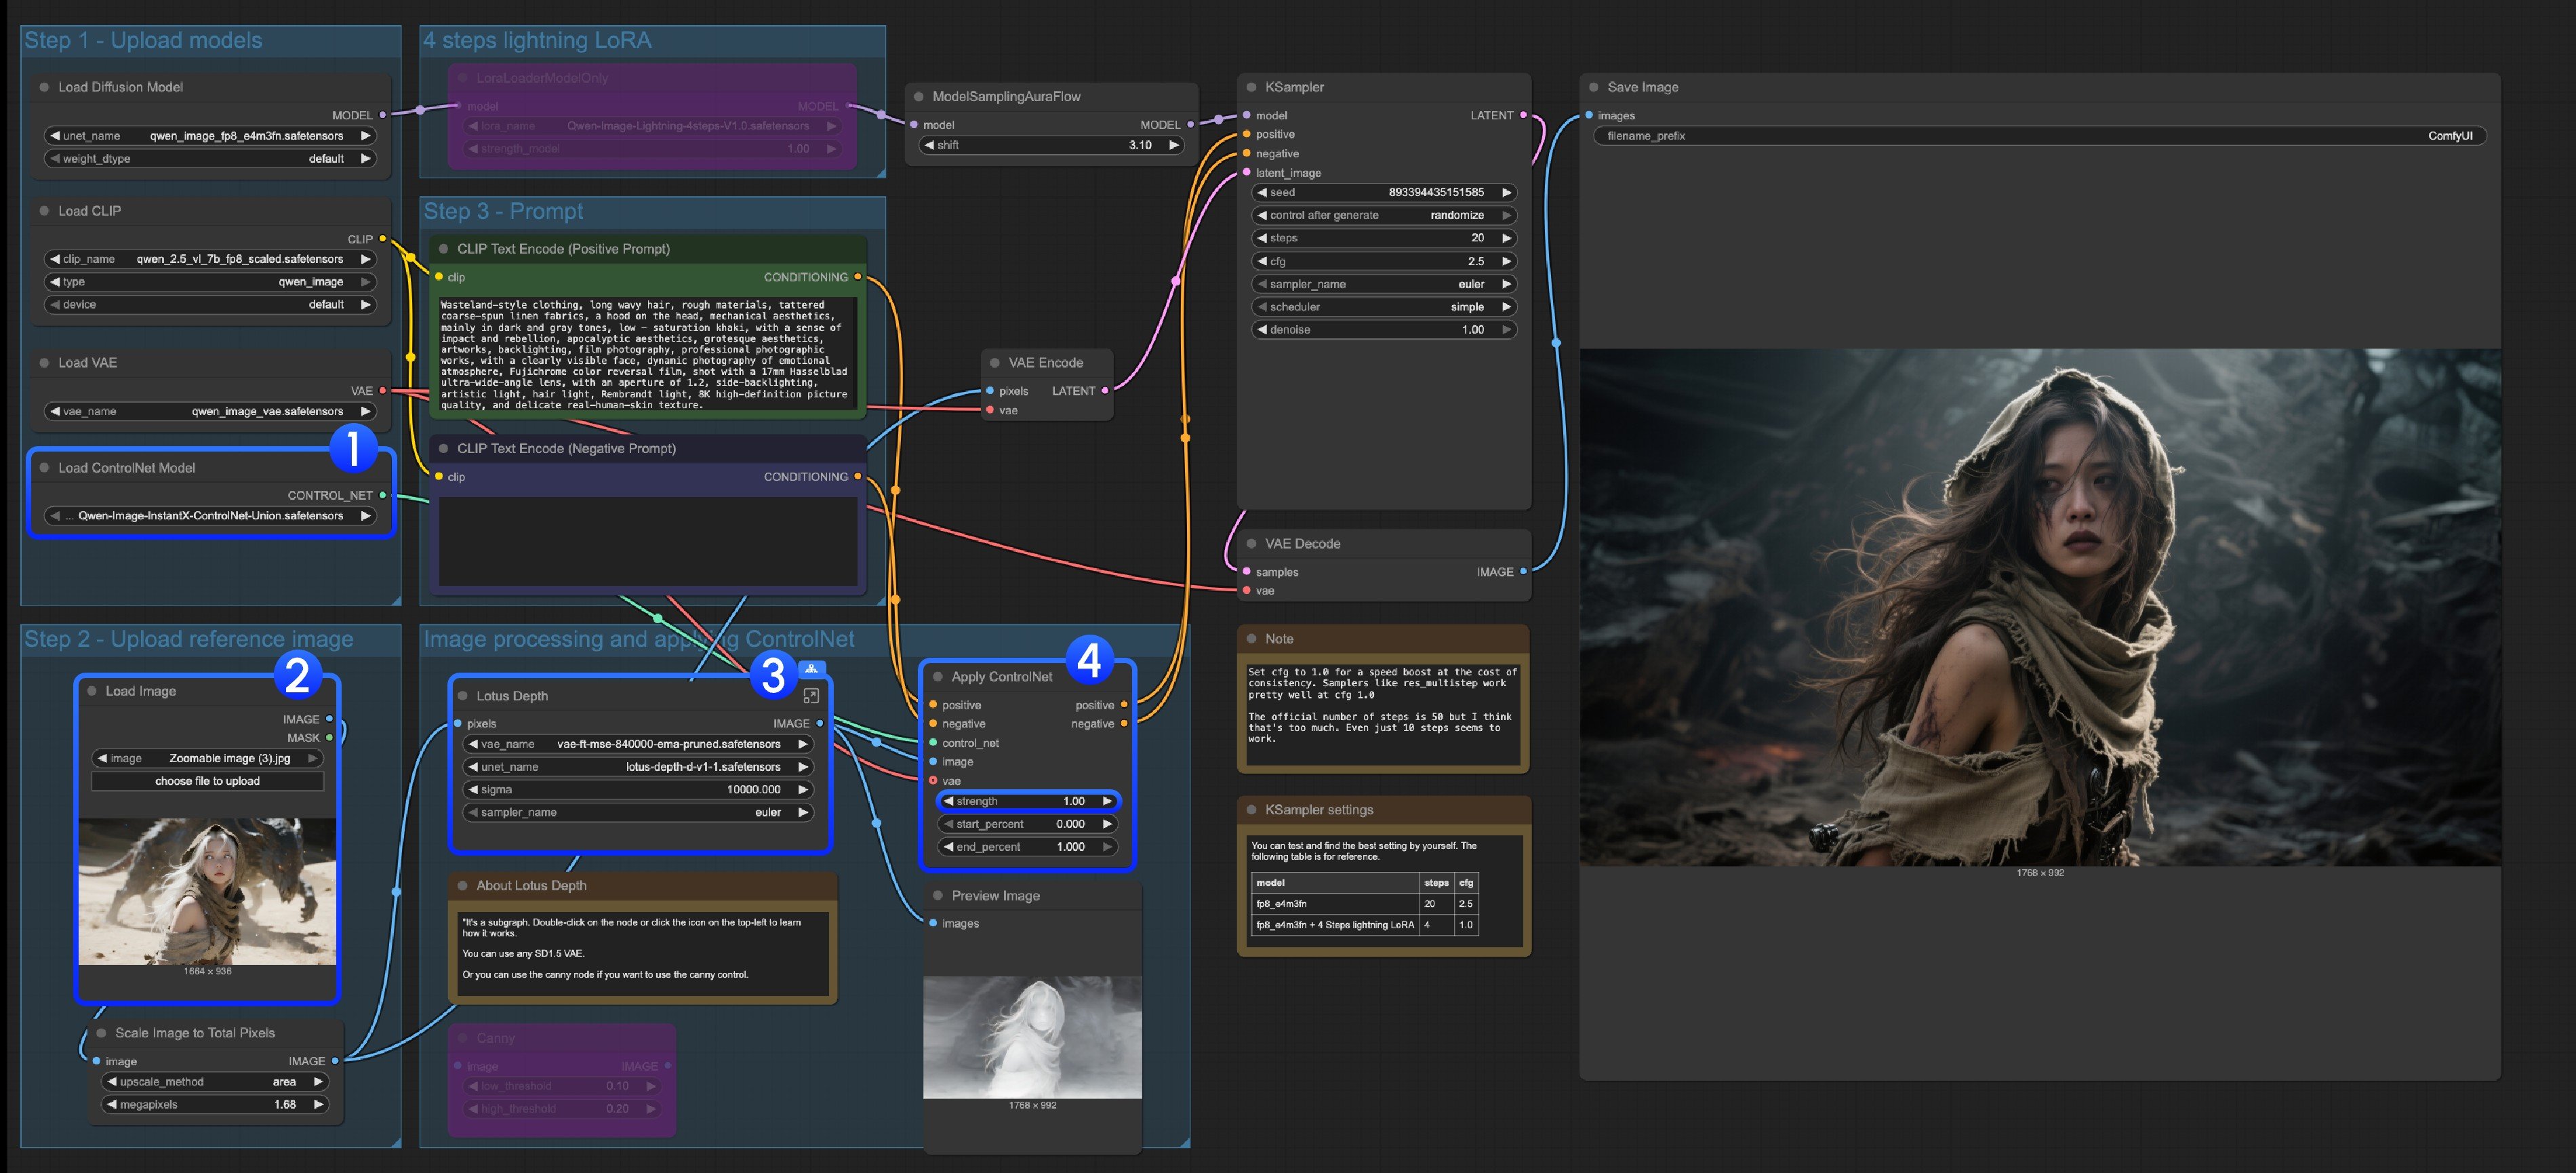 1. Ensure that the `Load ControlNet Model` node correctly loads the `Qwen-Image-InstantX-ControlNet-Union.safetensors` model
2. Upload input image
3. This subgraph uses the Lotus Depth model. You can find it in the templates or edit the subgraph to learn more, make sure all the models are loaded correctly
4. Click the `Run` button, or use the shortcut `Ctrl(cmd) + Enter` to run the workflow
## Qwen Image ControlNet DiffSynth-ControlNets 모델 패치 워크플로우
Comfy Cloud에서 실행하기
이 모델은 실제로 ControlNet이 아니라, 캐니, 딥스, 인페인트 등 세 가지 다른 제어 모드를 지원하는 모델 패치입니다.
원본 모델 주소: [DiffSynth-Studio/Qwen-Image ControlNet](https://www.modelscope.cn/collections/Qwen-Image-ControlNet-6157b44e89d444)\
Comfy Org 재호스팅 주소: [Qwen-Image-DiffSynth-ControlNets/model\_patches](https://huggingface.co/Comfy-Org/Qwen-Image-DiffSynth-ControlNets/tree/main/split_files/model_patches)
### 1. 워크플로우 및 입력 이미지
아래 이미지를 다운로드해 ComfyUI로 드래그해 해당 워크플로우를 불러오세요.

1. Ensure that the `Load ControlNet Model` node correctly loads the `Qwen-Image-InstantX-ControlNet-Union.safetensors` model
2. Upload input image
3. This subgraph uses the Lotus Depth model. You can find it in the templates or edit the subgraph to learn more, make sure all the models are loaded correctly
4. Click the `Run` button, or use the shortcut `Ctrl(cmd) + Enter` to run the workflow
## Qwen Image ControlNet DiffSynth-ControlNets 모델 패치 워크플로우
Comfy Cloud에서 실행하기
이 모델은 실제로 ControlNet이 아니라, 캐니, 딥스, 인페인트 등 세 가지 다른 제어 모드를 지원하는 모델 패치입니다.
원본 모델 주소: [DiffSynth-Studio/Qwen-Image ControlNet](https://www.modelscope.cn/collections/Qwen-Image-ControlNet-6157b44e89d444)\
Comfy Org 재호스팅 주소: [Qwen-Image-DiffSynth-ControlNets/model\_patches](https://huggingface.co/Comfy-Org/Qwen-Image-DiffSynth-ControlNets/tree/main/split_files/model_patches)
### 1. 워크플로우 및 입력 이미지
아래 이미지를 다운로드해 ComfyUI로 드래그해 해당 워크플로우를 불러오세요.

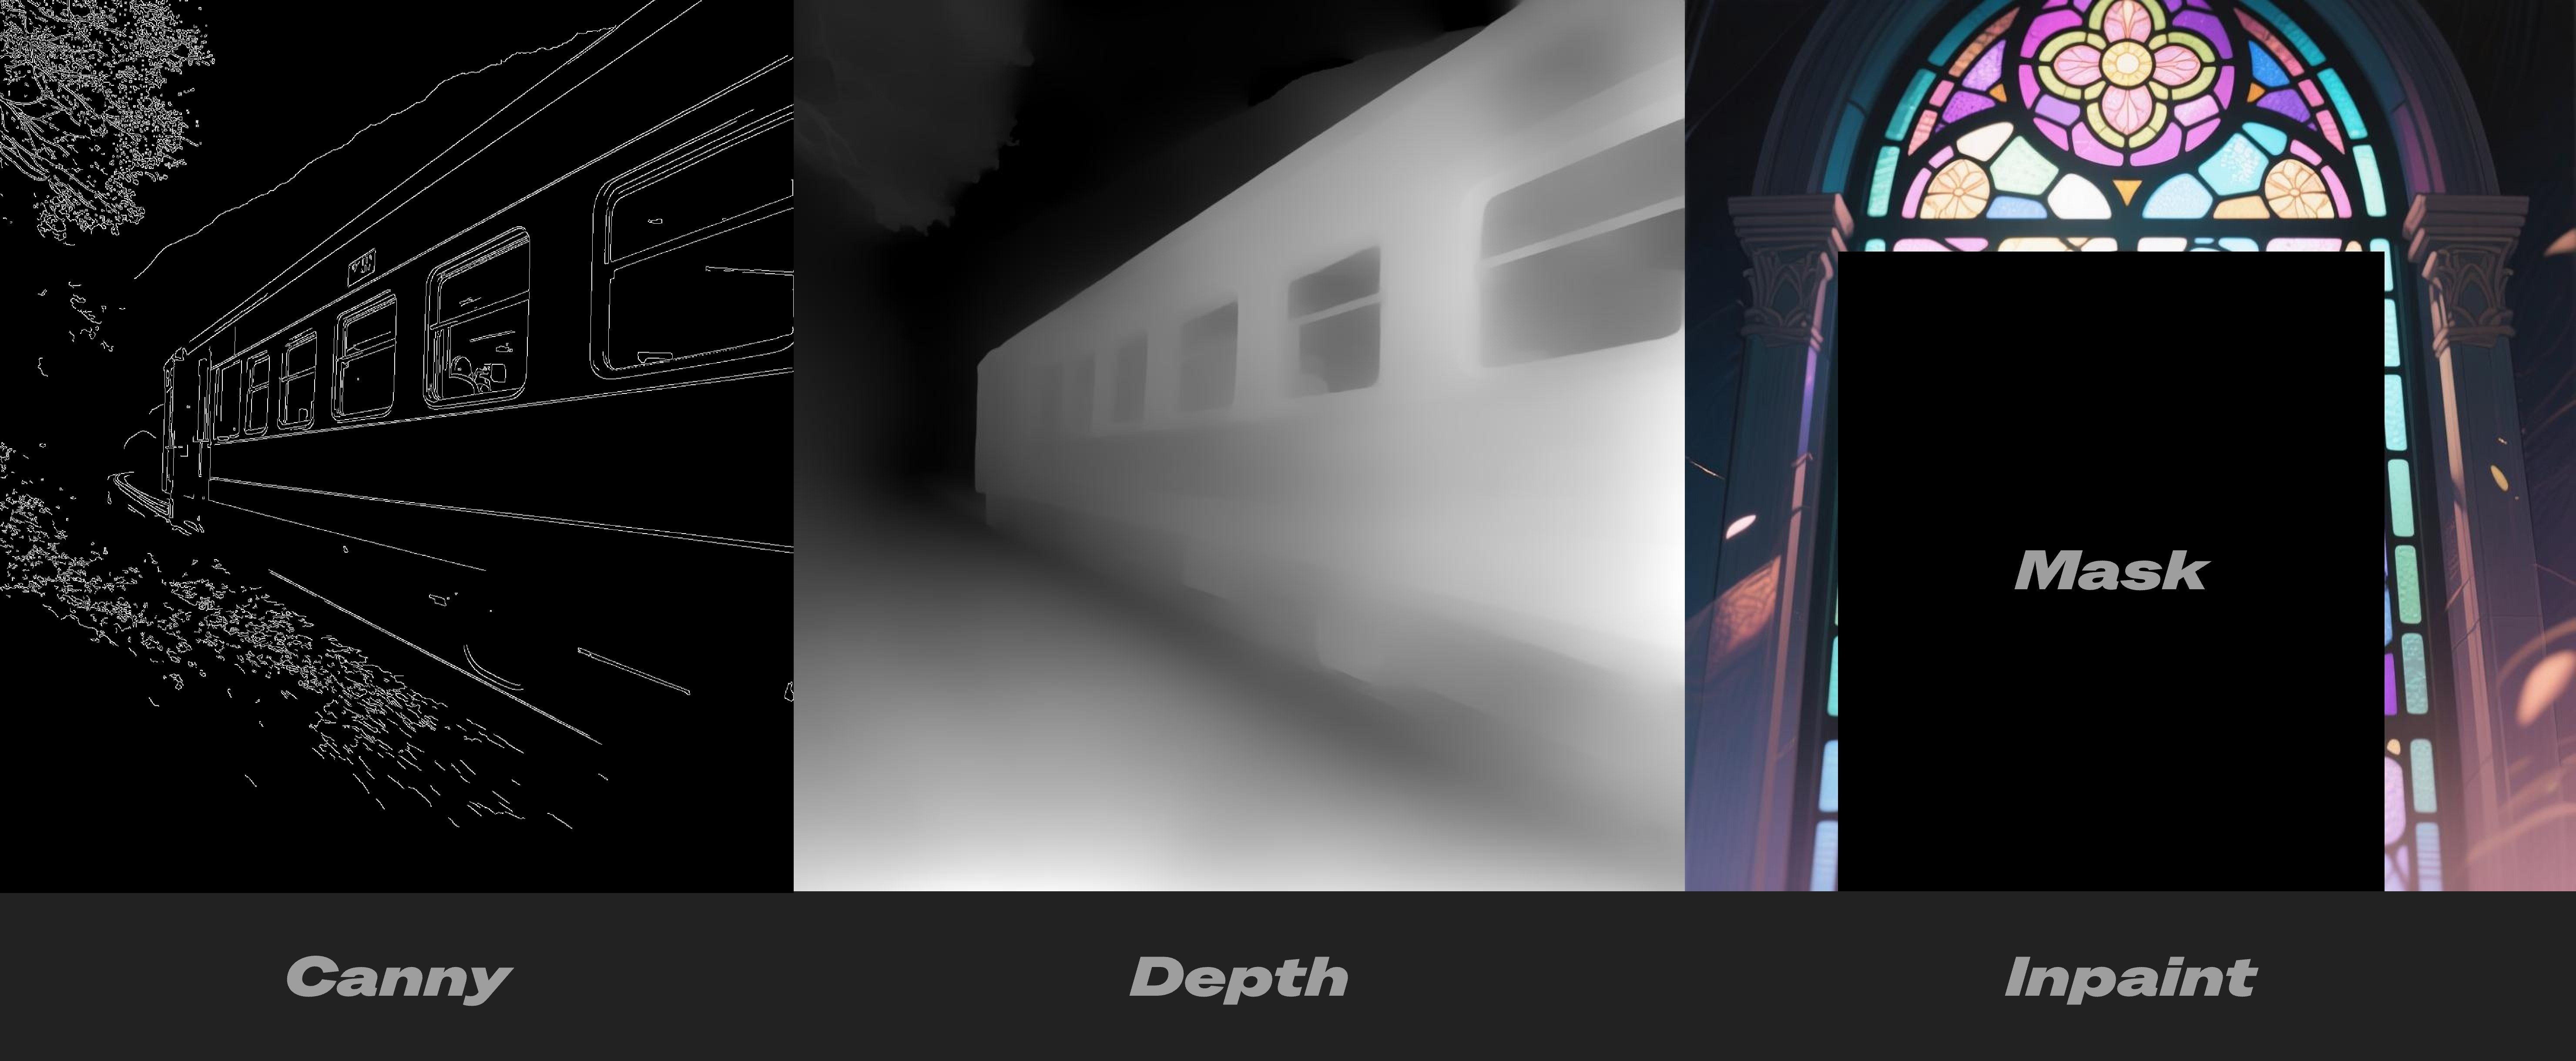 * 캐니: 처리된 캐니 에지, 라인아트 윤곽선
* 딥스: 공간 관계를 나타내는 사전 처리된 깊이맵
* 인페인트: 마스크를 사용해 다시 그려야 할 영역을 표시해야 합니다.
이 패치 모델은 세 가지 다른 모델로 나뉘므로, 입력 시 정확한 사전 처리 유형을 선택해 이미지가 제대로 처리되도록 해야 합니다.
**캐니 모델 ControlNet 사용 지침**
* 캐니: 처리된 캐니 에지, 라인아트 윤곽선
* 딥스: 공간 관계를 나타내는 사전 처리된 깊이맵
* 인페인트: 마스크를 사용해 다시 그려야 할 영역을 표시해야 합니다.
이 패치 모델은 세 가지 다른 모델로 나뉘므로, 입력 시 정확한 사전 처리 유형을 선택해 이미지가 제대로 처리되도록 해야 합니다.
**캐니 모델 ControlNet 사용 지침**
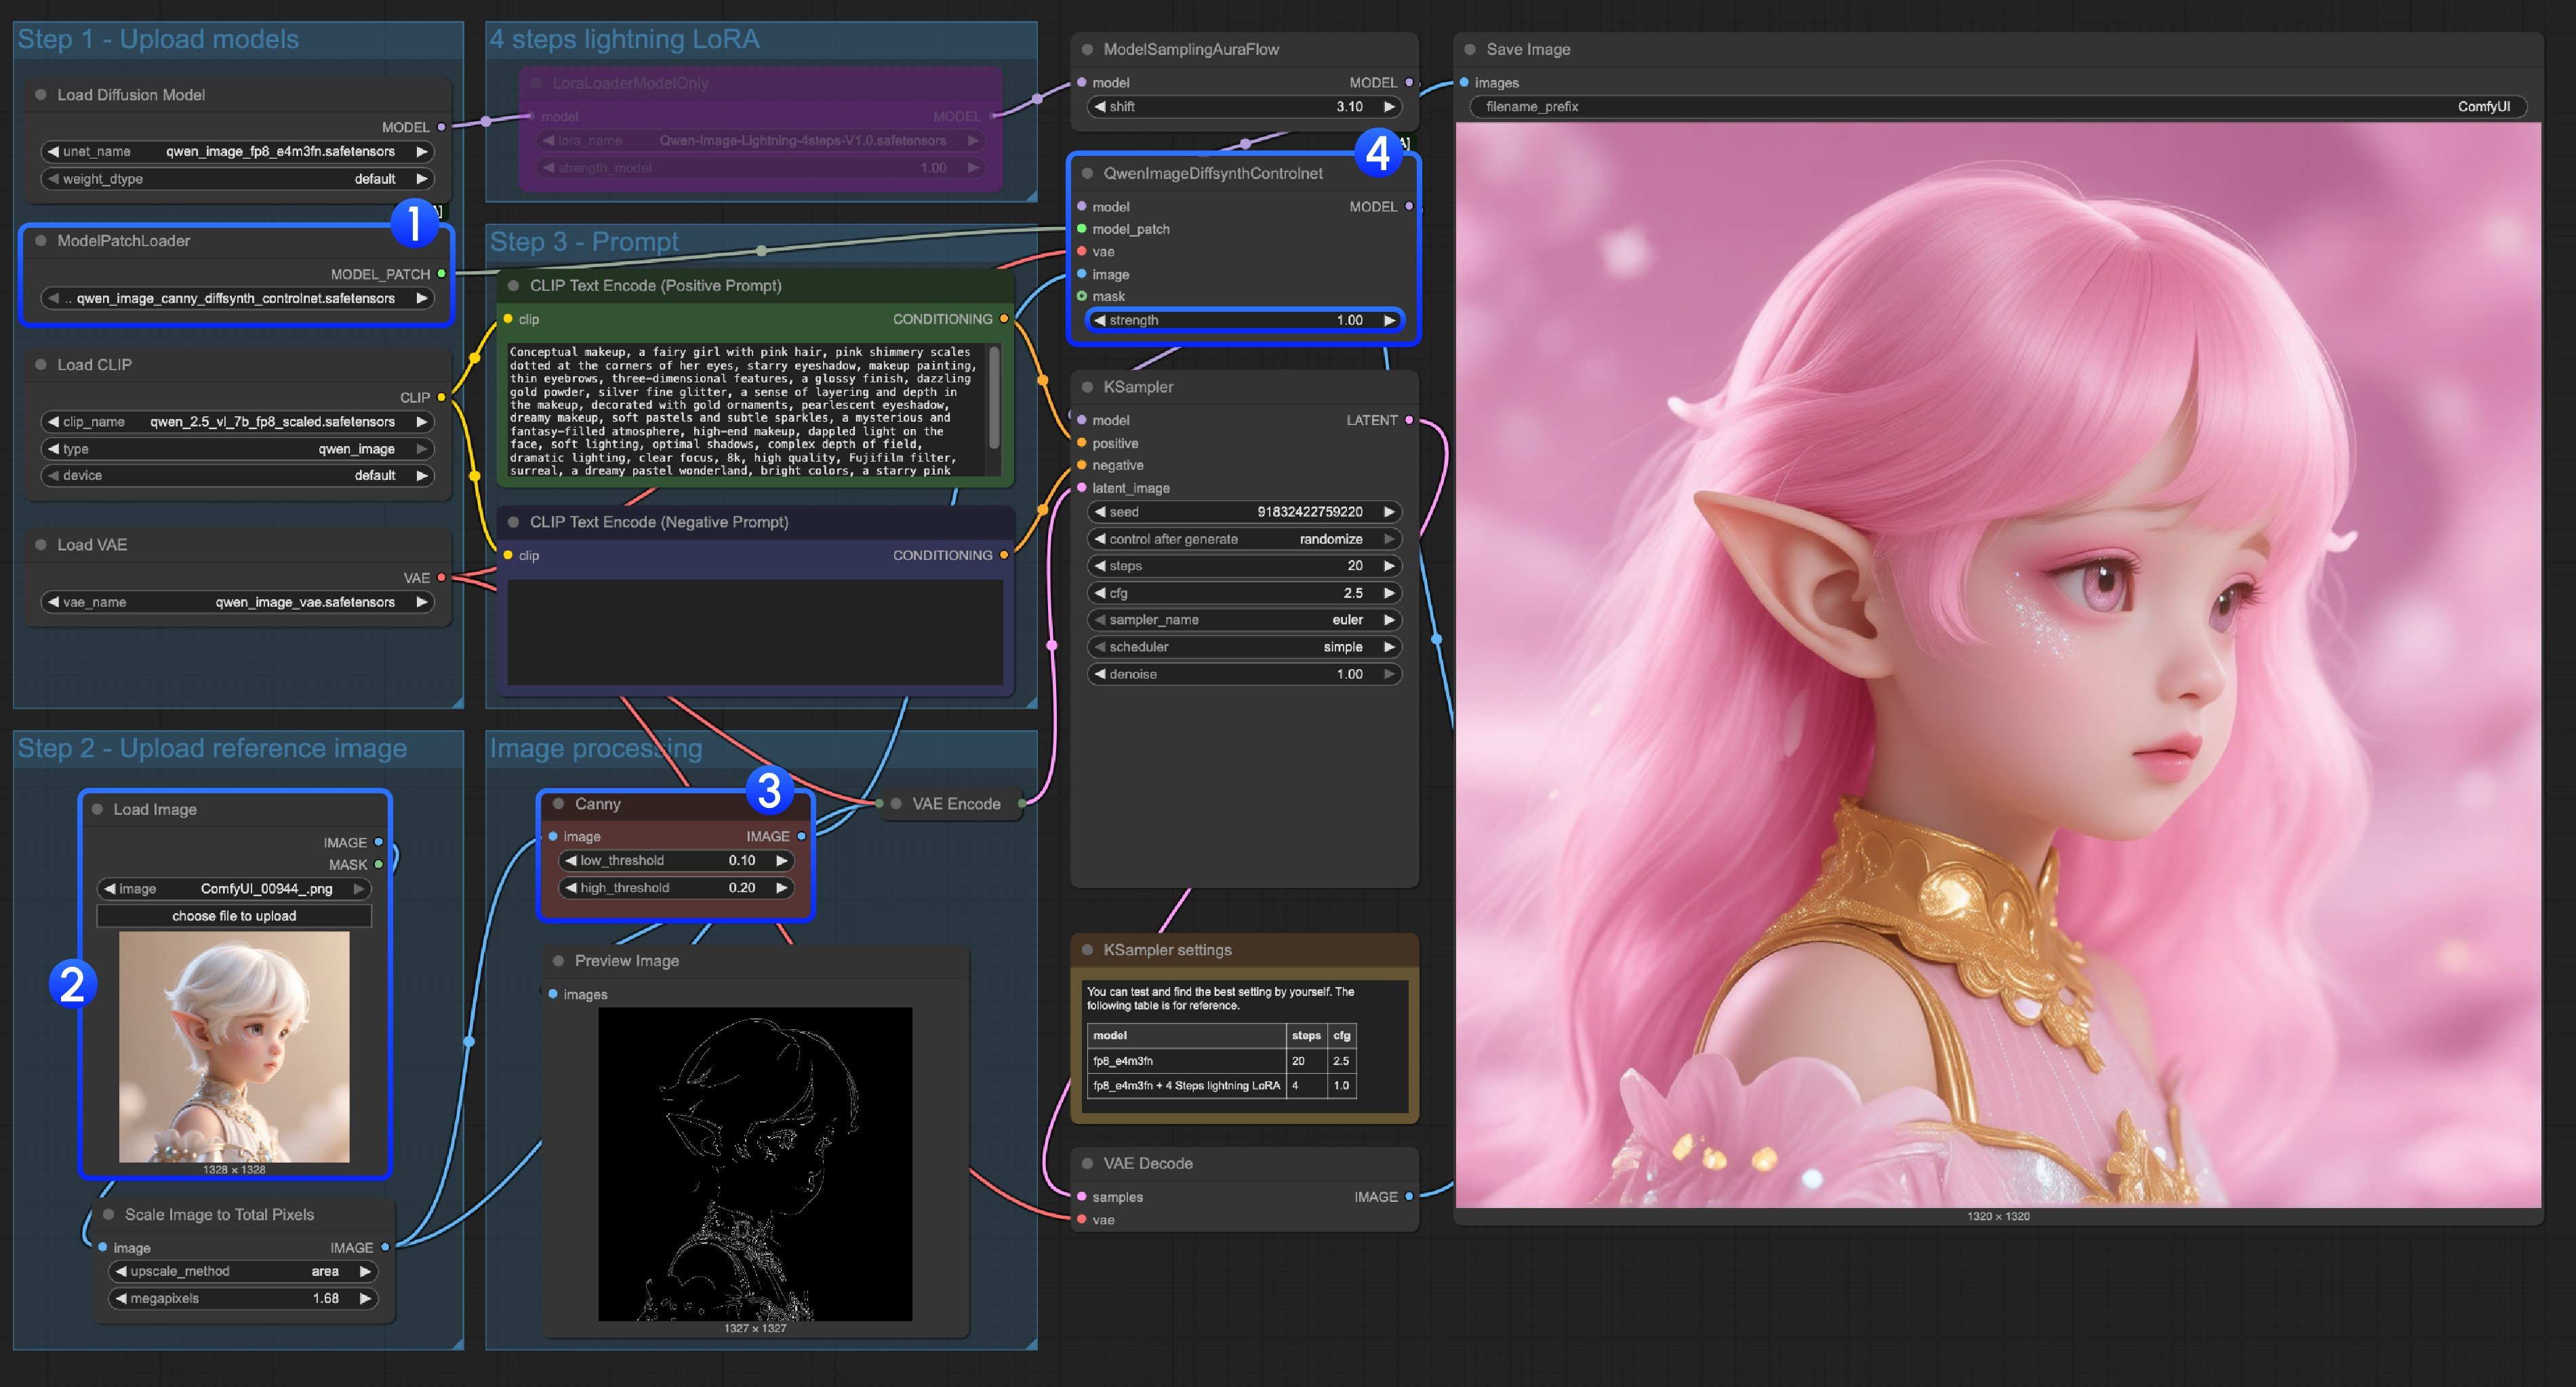 1. `qwen_image_canny_diffsynth_controlnet.safetensors`가 로드되었는지 확인하세요.
2. 이후 처리를 위해 입력 이미지를 업로드하세요.
3. 캐니 노드는 원본 사전 처리 노드로, 설정한 매개변수에 따라 입력 이미지를 처리해 생성을 제어합니다.
4. 필요하다면 `QwenImageDiffsynthControlnet` 노드의 `strength`를 수정해 라인아트 제어 강도를 조정할 수 있습니다.
5. `Run` 버튼을 클릭하거나, 단축키 `Ctrl(cmd) + Enter`를 사용해 워크플로우를 실행하세요.
> qwen\_image\_depth\_diffsynth\_controlnet.safetensors를 사용하려면 이미지를 깊이맵으로 사전 처리하고 `image processing` 부분을 교체해야 합니다. 이 사용법은 이 문서의 InstantX 처리 방법을 참고하세요. 다른 부분은 캐니 모델 사용법과 비슷합니다.
**인페인트 모델 ControlNet 사용 지침**
1. `qwen_image_canny_diffsynth_controlnet.safetensors`가 로드되었는지 확인하세요.
2. 이후 처리를 위해 입력 이미지를 업로드하세요.
3. 캐니 노드는 원본 사전 처리 노드로, 설정한 매개변수에 따라 입력 이미지를 처리해 생성을 제어합니다.
4. 필요하다면 `QwenImageDiffsynthControlnet` 노드의 `strength`를 수정해 라인아트 제어 강도를 조정할 수 있습니다.
5. `Run` 버튼을 클릭하거나, 단축키 `Ctrl(cmd) + Enter`를 사용해 워크플로우를 실행하세요.
> qwen\_image\_depth\_diffsynth\_controlnet.safetensors를 사용하려면 이미지를 깊이맵으로 사전 처리하고 `image processing` 부분을 교체해야 합니다. 이 사용법은 이 문서의 InstantX 처리 방법을 참고하세요. 다른 부분은 캐니 모델 사용법과 비슷합니다.
**인페인트 모델 ControlNet 사용 지침**
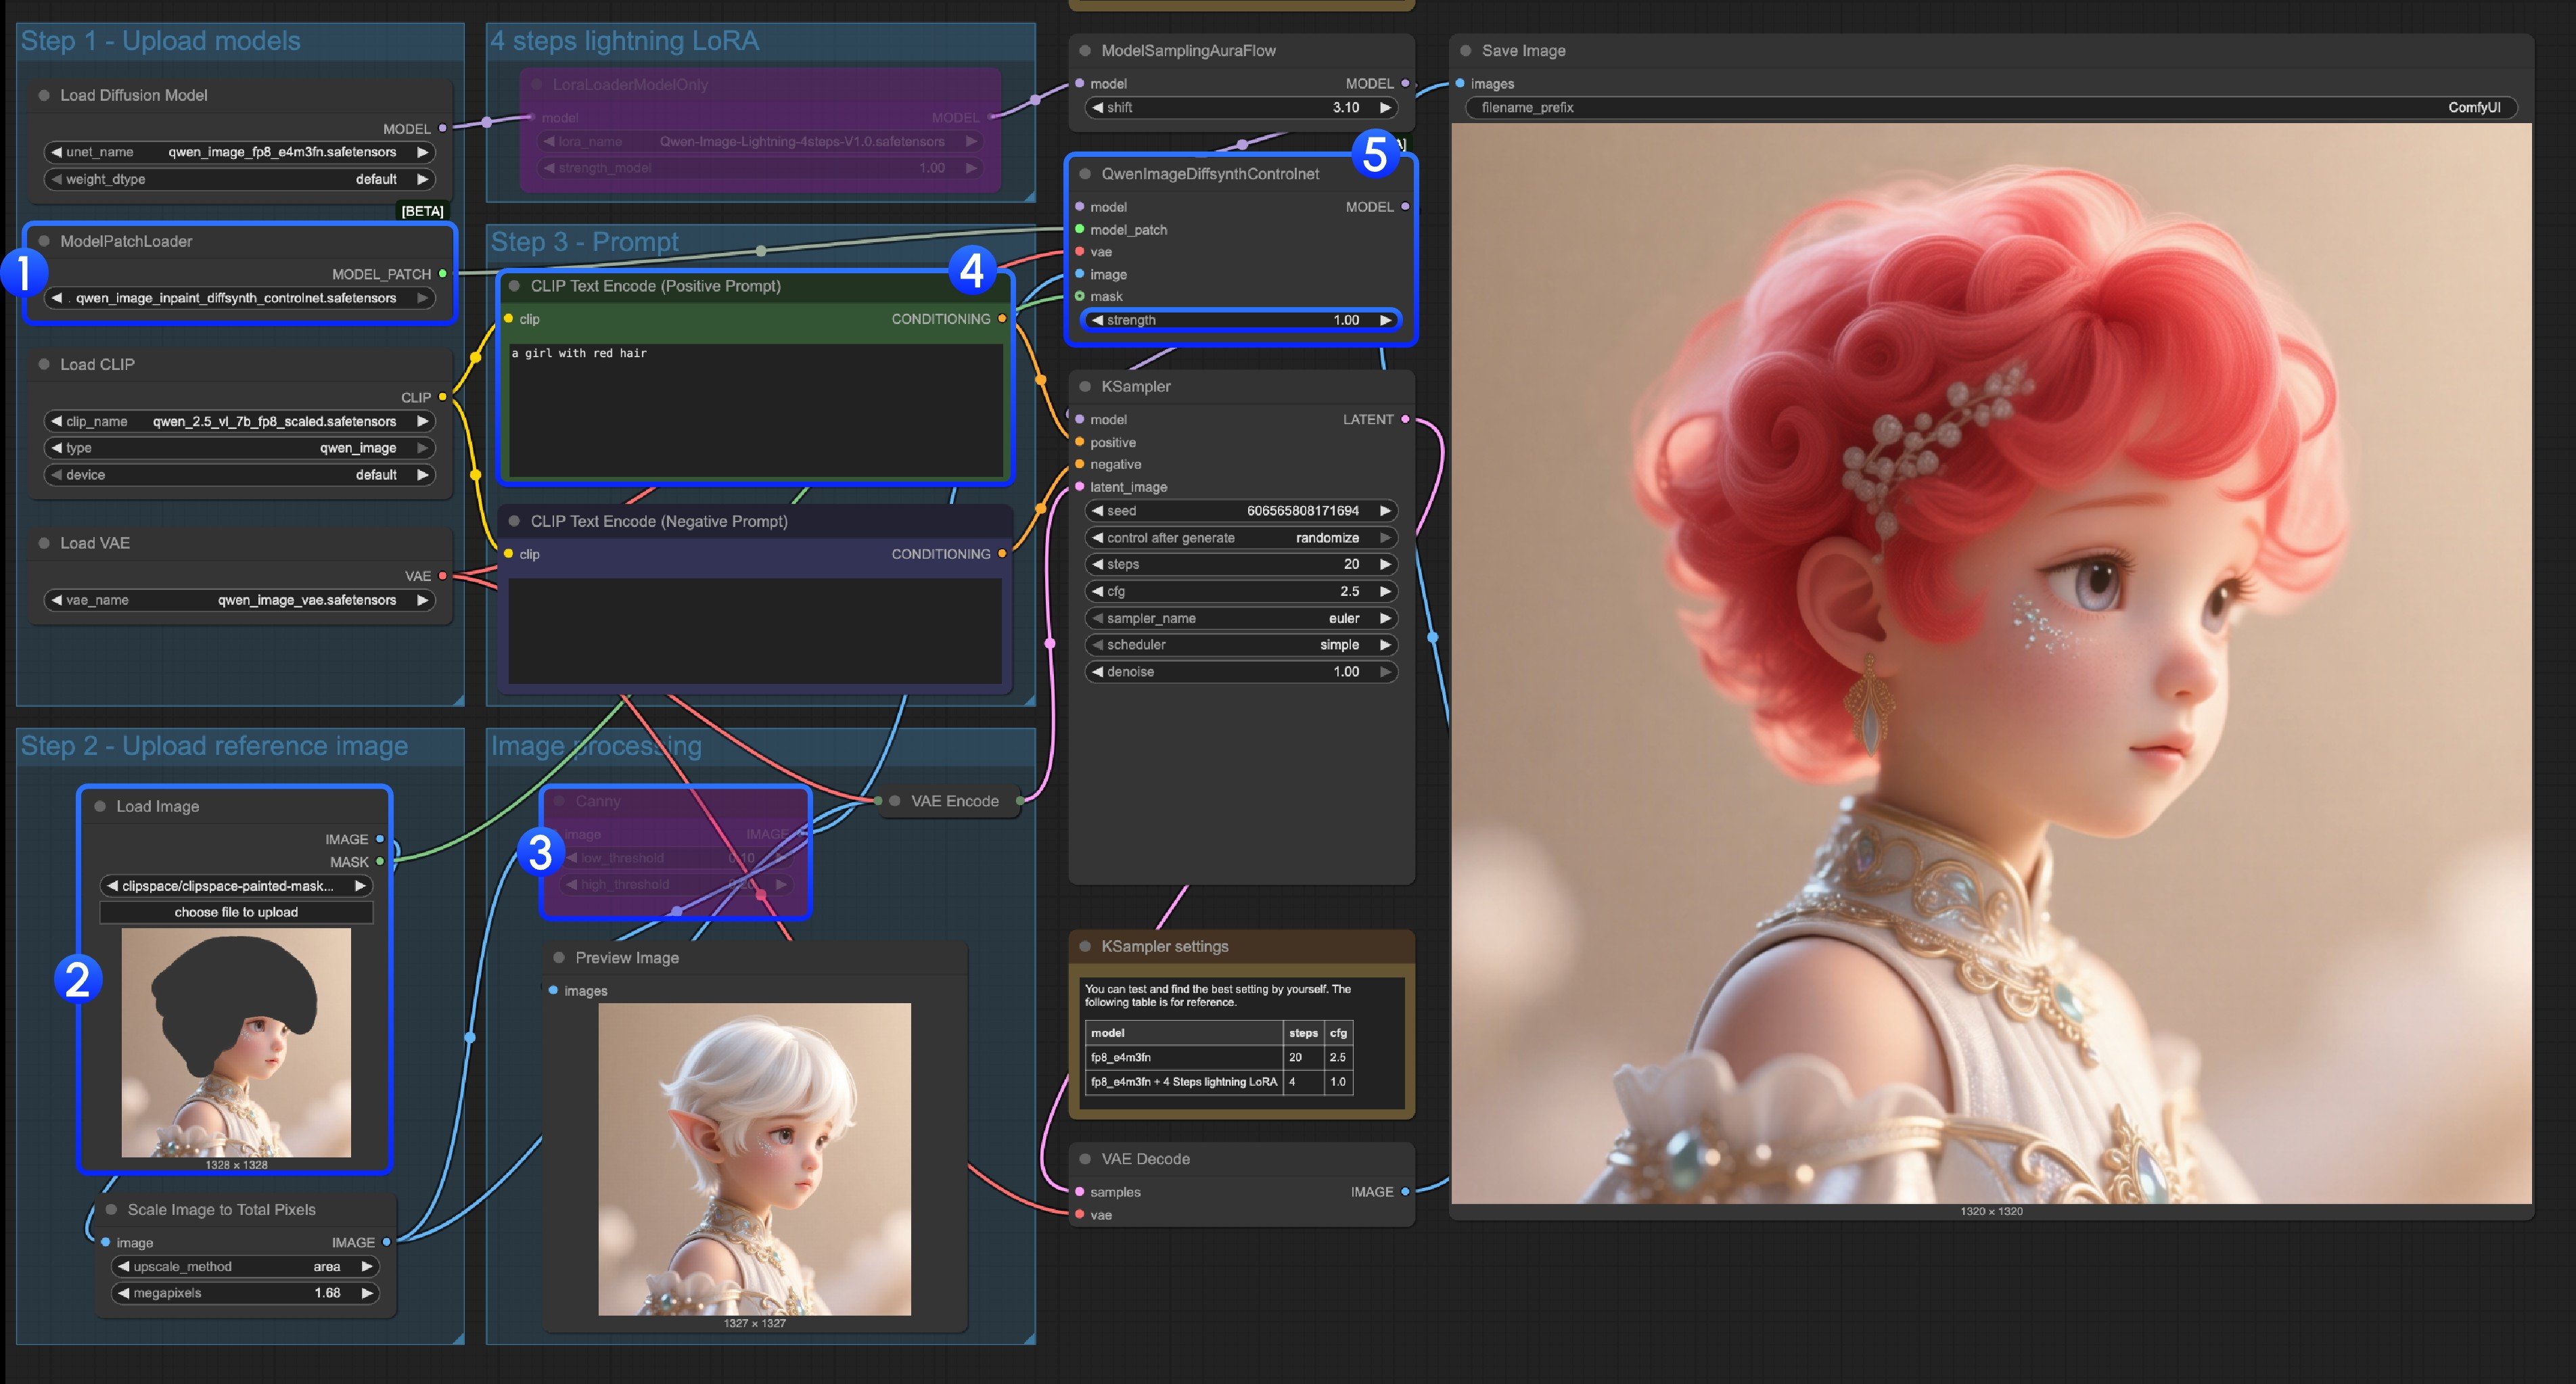 인페인트 모델의 경우, [Mask Editor](/ko/interface/maskeditor)를 사용해 마스크를 그린 후 이를 입력 제어 조건으로 사용해야 합니다.
1. `ModelPatchLoader`가 `qwen_image_inpaint_diffsynth_controlnet.safetensors` 모델을 로드했는지 확인하세요.
2. 이미지를 업로드하고 [Mask Editor](/ko/interface/maskeditor)를 사용해 마스크를 그립니다. 해당 `Load Image` 노드의 `mask` 출력을 `QwenImageDiffsynthControlnet`의 `mask` 입력에 연결해 정확한 마스크가 로드되도록 해야 합니다.
3. `Ctrl-B` 단축키를 사용해 워크플로우의 원래 캐니를 바이패스 모드로 설정해 해당 캐니 노드의 처리를 무효화하세요.
4. `CLIP Text Encoder`에서 마스크로 변경하고 싶은 내용을 입력하세요.
5. 필요하다면 `QwenImageDiffsynthControlnet` 노드의 `strength`를 수정해 해당 제어 강도를 조정할 수 있습니다.
6. `Run` 버튼을 클릭하거나, 단축키 `Ctrl(cmd) + Enter`를 사용해 워크플로우를 실행하세요.
## Qwen Image Union ControlNet LoRA 워크플로
인페인트 모델의 경우, [Mask Editor](/ko/interface/maskeditor)를 사용해 마스크를 그린 후 이를 입력 제어 조건으로 사용해야 합니다.
1. `ModelPatchLoader`가 `qwen_image_inpaint_diffsynth_controlnet.safetensors` 모델을 로드했는지 확인하세요.
2. 이미지를 업로드하고 [Mask Editor](/ko/interface/maskeditor)를 사용해 마스크를 그립니다. 해당 `Load Image` 노드의 `mask` 출력을 `QwenImageDiffsynthControlnet`의 `mask` 입력에 연결해 정확한 마스크가 로드되도록 해야 합니다.
3. `Ctrl-B` 단축키를 사용해 워크플로우의 원래 캐니를 바이패스 모드로 설정해 해당 캐니 노드의 처리를 무효화하세요.
4. `CLIP Text Encoder`에서 마스크로 변경하고 싶은 내용을 입력하세요.
5. 필요하다면 `QwenImageDiffsynthControlnet` 노드의 `strength`를 수정해 해당 제어 강도를 조정할 수 있습니다.
6. `Run` 버튼을 클릭하거나, 단축키 `Ctrl(cmd) + Enter`를 사용해 워크플로우를 실행하세요.
## Qwen Image Union ControlNet LoRA 워크플로



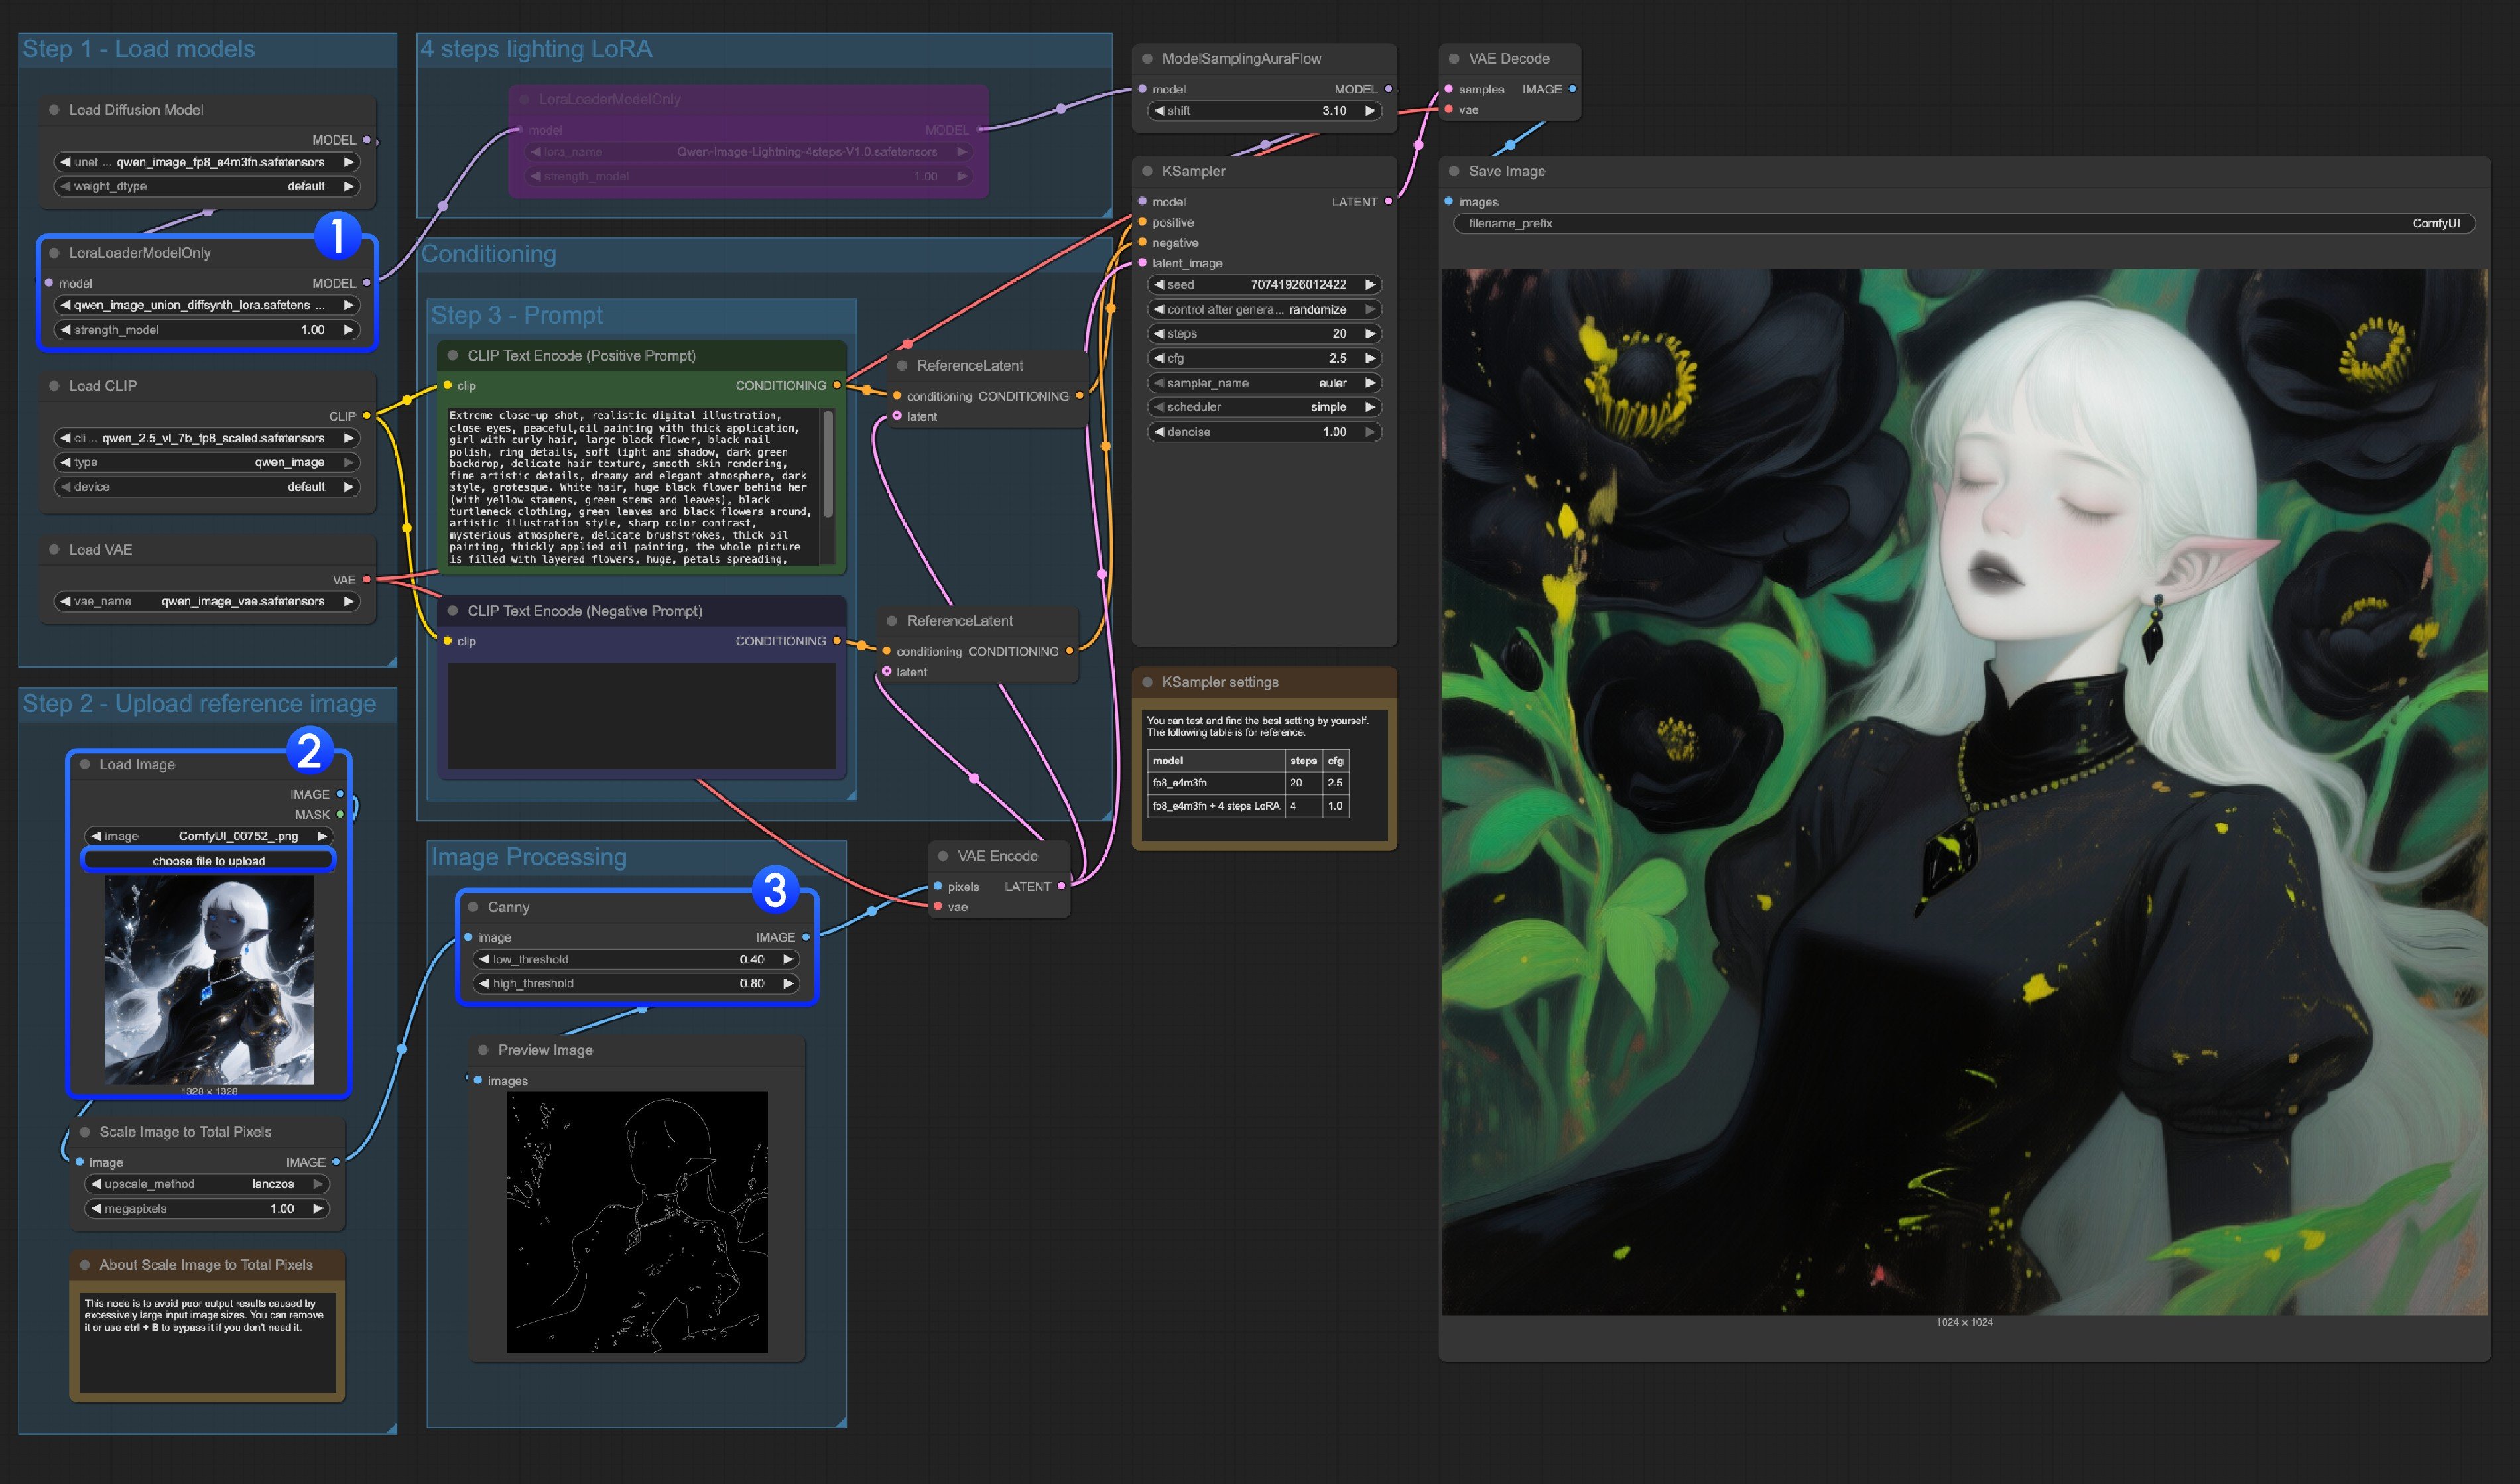 1. `LoraLoaderModelOnly`가 `qwen_image_union_diffsynth_lora.safetensors` 모델을 올바르게 로드하는지 확인하세요.
2. 입력 이미지를 업로드하세요.
3. 필요하다면 `Canny` 노드 파라미터를 조정할 수 있습니다. 입력 이미지마다 더 나은 이미지 전처리 결과를 얻기 위해 서로 다른 파라미터 설정이 필요하므로, 해당 파라미터 값을 조정하여 더 많거나 적은 세부 정보를 얻을 수 있습니다.
4. `Run` 버튼을 클릭하거나, 단축키 `Ctrl(cmd) + Enter`를 사용하여 워크플로를 실행하세요.
> 다른 유형의 제어를 사용하려면 이미지 처리 부분도 교체해야 합니다.
1. `LoraLoaderModelOnly`가 `qwen_image_union_diffsynth_lora.safetensors` 모델을 올바르게 로드하는지 확인하세요.
2. 입력 이미지를 업로드하세요.
3. 필요하다면 `Canny` 노드 파라미터를 조정할 수 있습니다. 입력 이미지마다 더 나은 이미지 전처리 결과를 얻기 위해 서로 다른 파라미터 설정이 필요하므로, 해당 파라미터 값을 조정하여 더 많거나 적은 세부 정보를 얻을 수 있습니다.
4. `Run` 버튼을 클릭하거나, 단축키 `Ctrl(cmd) + Enter`를 사용하여 워크플로를 실행하세요.
> 다른 유형의 제어를 사용하려면 이미지 처리 부분도 교체해야 합니다.